INSTRUCTIONS for Individual Stitches
Click on the names of the stitches illustrated below to see instructional videos. [images and guidelines from DMC website.]
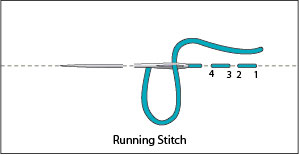
This stitch is used for outlining and for creating straight and curved lines.
 Stitch Guidelines:
-
- Work from right to left.
- Bring your needle up at 1, then down at 2, up at 3, and then down at 4. Continue stitching in that pattern.
- The spaces between your stitches can either be the same length as the stitches themselves or you can make them shorter to create a different look.
Stitch Tips:
-
- Keep an even tension and avoid pulling your thread (this will cause the stitches to pucker).
- See the Laced Running Stitch for a variation on this stitch.
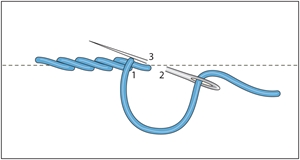
Stem Stitch (at 3:36)
This stitch makes a rope-like appearance. It’s used for outlining, for creating straight and curved lines, for making stems for plants, or for filling (if the rows are stitched close together).
Stitch Guidelines:
-
- Work from left to right.
- Bring your needle up at 1, then down at 2.
- Bring your needle back up halfway between 1 and 2 at point 3 (just slightly above the first stitch).
- Be sure to keep the thread below the needle.
- Continue stitching.
Stitch Tip:
-
-
- Make smaller stitches for curved lines to maintain a rounded, smooth look.
-
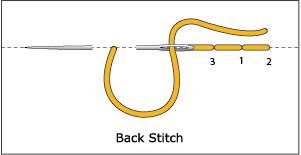
Back Stitch (at 1:30)
This stitch is used for outlining and for creating straight and curved lines.
Stitch Guidelines:
-
-
- Work from right to left.
- Bring your needle up at 1, then back down at 2.
- Move left & bring your needle up at 3, then back down at 1.
- Continue stitching from there.
-
Stitch Tip:
-
-
- Make shorter stitches for curved lines and shapes.
-
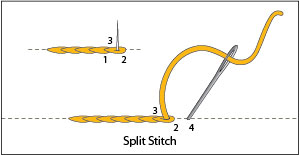
Split Stitch (at 2:37) and more in-depth video here
This stitch is often used for outlining, for creating curved lines, or for filling a shape by working rows closely together.
Stitch Guidelines:
-
- Work from left to right.
- Bring your needle up at 1, then down at 2.
- Bring your needle back up at 3, splitting the center of the previous stitch.
- Take your needle down at 4 and then back up at 2.
- Continue stitching.
Stitch Tips:
-
- Make shorter stitches for curvy lines.
Chain Stitch (at 6:23), more in-depth video here
Use this stitch for outlining, making straight and curved lines, or as filler (stitch rows close together if using it for filler).
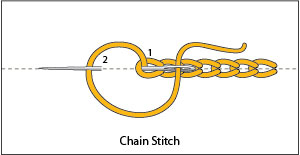
Stitch Guidelines:
-
- Work from top to bottom.
- Bring your needle up at 1 and then re-insert it back into that same hole—forming a loop.
- Bring your needle up at 2 and pull the thread to tighten the loop until the desired shape is achieved.
- Repeat multiple stitches to create a chain.
- To end the row, make a small stitch over the last loop to hold it in place and secure the thread on the backside.
Stitch Tip:
-
- Keep your thread tension even with this stitch otherwise your chain might look inconsistent.
Seed Stitch (at10:58)and a variation here
Use this stitch to fill in spaces, create flower centers, or to make background textures such as leaves, snow, and sand. 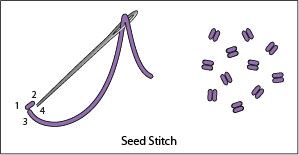
Stitch Guidelines:
-
- The seed stitch is created by making two small stitches side by side. Then place them randomly to fill in an area.
- To create this stitch:
- Come up at 1 and down at 2.
- Come up at 3 and down at 4.
- Continue grouping your stitches together randomly and at different angles. This will create a “scattered seed” look.
- To create this stitch:
- The seed stitch is created by making two small stitches side by side. Then place them randomly to fill in an area.
Stitch Tip:
-
- If you are trying to create a decorative border stitch, make sure your stitches are made in even rows
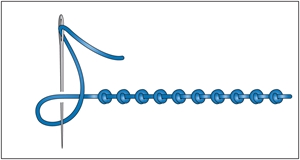
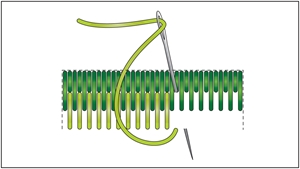
Coral Stitch
Use this stitch when you want to create details like decorative borders, foliage, and plant stems.
Stitch Guidelines:
-
- Working from right to left, hold the working thread to the left of the starting point (or the last stitch).
- Insert the needle into the fabric above the working thread and bring the tip of the needle out just under the thread.
- Wrap your thread around the needle from left to right and pull the needle through the resulting loop
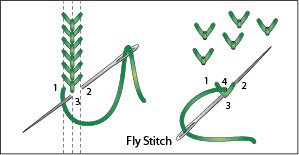
Fly Stitch to fill in and to create a branching shape
Stitch in rows for edging, or singly for accents, plants and foliage, decorative lines, and interesting filling.
Stitch Guidelines:
-
- Bring your needle up at 1 and down at 2, leaving a loop.
- Come up at 3 and with the needle over the loop, pull the thread to make a V.
- Go down at 4 to anchor the V shape.
Stitch Tip:
-
- Lengthen the anchor stitch to form a Y.
French Knot (at 5:18), more in-depth video here
The French knot can be used for creating decorative dots, for filling flower centers, or for making leaves, plants, and eyes.

Stitch Guidelines:
-
- Bring your needle up at 1.
- Hold your thread taut with the other hand and wrap it twice around the end of the needle.
- Gently pull your thread to tighten the wrapped portion of thread. While holding it taut, insert your needle next to 1.
- Pull your thread through onto the backside until the knot is formed and lies securely on the surface of the fabric.
Stitch Tip:
-
- If you’d like to make a larger knot, wrap the thread around your needle a couple of extra times or use thicker thread.
Long and Short Stitch
This stitch is used for filling in larger shapes, especially to create color shading.
Stitch Guidelines:
-
- First work a row of alternating long and short satin stitches. (Be sure to keep the upper edge of the design line even.)
- Next, work a second row of long, even-length stitches into the short stitches of the first row, passing your needle through the tip of the stitch above.
- Continue stitching rows until the shape is nearly filled and the last row of long stitches are worked along the bottom of the design line.
- Stitch the last row with short stitches to fill in the open area along the bottom.
Stitch Tip:
-
- To achieve shading, change the thread color as needed by row.
Satin Stitch (at 8:25)
The satin stitch is often used for making a solid filling in shapes.
(NOTE: For this project, we usually outline with a linear stitch before satin stitching shapes.)
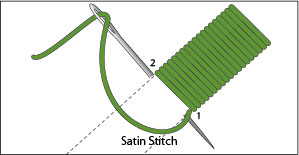
Stitch Guidelines:
-
- Bring your needle up at 1, down at 2, then back up right next to 1 and down right next to 2.
- Place your stitches close together to fill in an area.
Stitch Tip:
-
- Make sure your thread lays flat and doesn’t twist at all. This will ensure a smooth look.
- To raise the stitching, make a split stitch just inside the outline of the shape before you start
Padded Satin Stitch and this link is good too.
This stitch is used for filling in shapes.
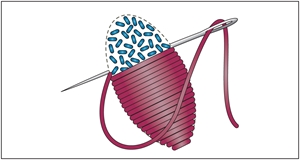
Stitch Guidelines:
-
- Make a cluster of seed stitches.
- Stitch the satin stitch over to create a gorgeous raised look
Star Stitch
This stitch is often used to create stars, flowers and other decorative accents. Make the star stitch in a row to create a beautiful border or disperse them to create a random design of stars.
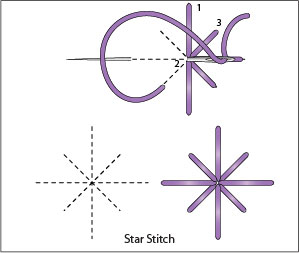
Stitch Guidelines:
-
- Starting at the top, bring your needle up at 1 and down to the center at 2.
- Bring the needle up at 3 and down to the center at 2.
- Continue stitching in a clockwise direction until you have 8 evenly placed stitches—creating a lovely star.
Stitch Tip:
-
- If you want to create an eyelet effect, tighten the tension on each stitch. This will create an opening in the center. This technique works well on evenweave fabrics
Panel stretching
Stretching fabric onto to small (18″ x 36″) frames if the fabric is already attached to the long boards
Click here for instructional photos.